Internal Interface Design
This document describes the internal interface design of OS2iot.
Backend REST API
The primary way of communicating with the back end is through the RESTful API.
Swagger documentation
The documentation of the endpoints, their parameters and so forth is documented using Swagger.
You can access Swagger through the endpoint: /api/v1/docs/ of the backend. So for the test environment,
it would be: https://test-os2iot-backend.os2iot.dk/api/v1/docs/.
Authentication
The API is protected using JSON Web Token (JWT), see https://jwt.io/introduction/ for an introduction.
To get a JWT you must perform a login using username and password to the /api/v1/auth/login endpoint.
In response to a valid login, a JWT is sent, inside a JSON object.
To call protected endpoints the Authorization header must be set to Bearer xxx.yyy.zzz where xxx.yyy.zzz is a valid JWT.
JWT Payload
The JWT payload currently contains two pieces of information:
userId of the logged in user.
email (username) of the logged in user.
JWT Expiration
The JWT is by default set to expire after nine hours. upon which it is invalid. To acquire a new one, a new login must be performed as described above.
API key access
OS2IoT supports API key authentification. This allows external clients to use the system without the need of a browser or a user.
Configuration
In order to use this type of authentication, an administrator must create an API key with one or more user groups. This can be done on the portal through the API key management pages. It can be accessed through the menu.
Usage
With an API key, you can fetch and manage data in your OS2IoT system just as well as if you were a user on the browser. What you can access and manage is limited by the user group (-s) tied to the API key.
With that in mind, let’s dive into using an API key. Let’s make a few assumptions:
We have an API key with the value
00000000-abcd-ef00-0000-012345678901This API key is tied to a user group with Read priviliges to an organization and all its applications
There exists a
GETendpoint for fetching applications. The route ends with/applicationThe Base URL for the OS2IOT Backend is known, e.g.
https://os2iot-backend.SERVERNAME.EXAMPLE/api/v1/chirpstack/
There’s a broad variety of applications, terminals etc. which can perform HTTP requests. To authenticate this request with the API key, you must provide it as the HTTP header “x-api-key”.
Usage in Postman
Below, a screenshot is shown of how this can be done in Postman.
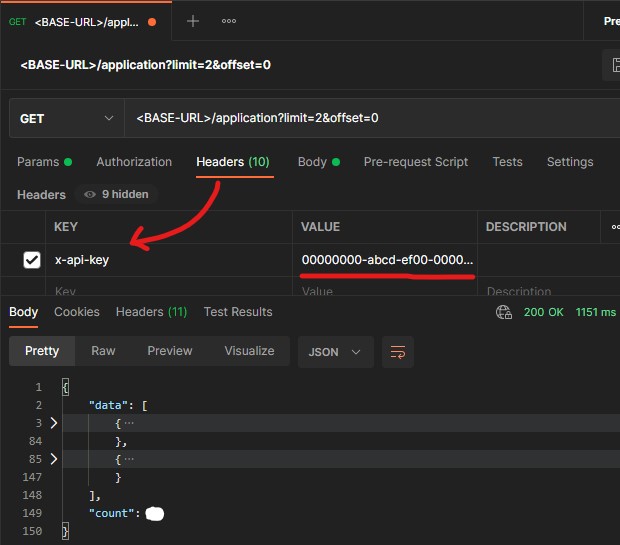
The bottom half of the screenshot is the response. The request was limited to 2 applications using the limit query parameter.
As seen, the backend responded with 2 (collapsed) applications.
Usage in Python
A simple example of making the API call in Python
import requests
url = "https://os2iot-backend.SERVERNAME.EXAMPLE/api/v1/application?limit=2&offset=0"
headers = {
  'x-api-key': '00000000-abcd-ef00-0000-012345678901'
}
response = requests.request("GET", url, headers=headers)
print(response.text)
Limitations
While most of the system is accessible using API key authentication, there are some security limitations, however:
You cannot manage your API key or someone else’s
You cannot manage users nor user groups
You cannot manage organizations
You can use an API key to request information necessary for using OS2IoT by using endpoints starting with /api-key-info. They require API key authentication.
For instance, to fetch the organization tied to your API key, you can make a GET request to the route which ends with /api-key-info/organization.
Currently, there’s no expiration date on an API key. It will not expire unless an administrator revokes it on the key management page.