External Interface Design
This document describes the external interface design of OS2iot. This includes an overview of the interfaces, the internal and external integration patterns, and the details of both incoming and outgoing integrations (IoT device and data target, respectively).
Interfaces
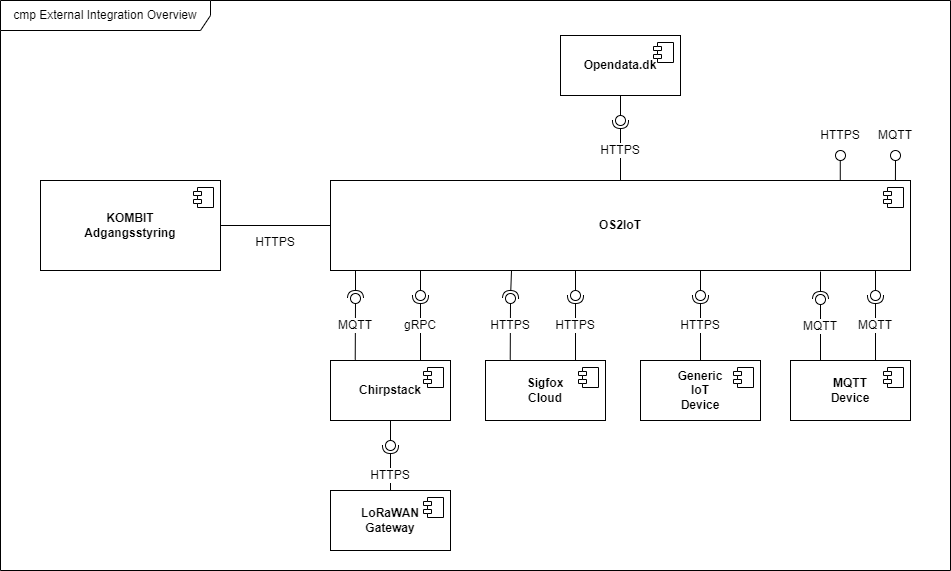
This figure shows an overview of the external interfaces of OS2iot, each will be explained later in seperate sections.
Integration patterns
Internal systems
Internally, OS2iot consists of five components shown in this figure.
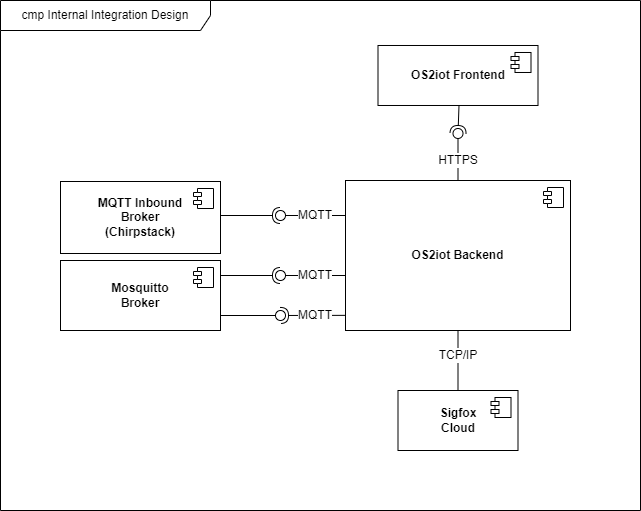
Two different patterns are used between the internal components:
- Request-responseUsed between the frontend, backend and database.
- Publish-subscribeUsed in communication between the backend and MQTT broker for Chirpstack and the internal MQTT broker.
External systems
External system integrations for OS2iot are divided into three groups:
IoT devices
Data targets
Authentication
IoT devices
Figure 3 - IoT device integration overview
All IoT device integrations except LoRaWAN and MQTT use callbacks to send data to OS2iot using HTTPS in a request-response manner. Device management for Sigfox (i.e. adding and modifying IoT devices) is done by sending requests to Sigfox’s Cloud backend.
MQTT devices uses the MQTT protocol to communicate with the broker.
Data from Chirpstack devices are sent to OS2iot through Chirpstack using MQTT, where Chirpstack is the publisher and OS2iot is the subscriber. Device management is done from OS2iot by sending gRPC requests to Chirpstack.
Data targets
OS2iot supports integrations to:
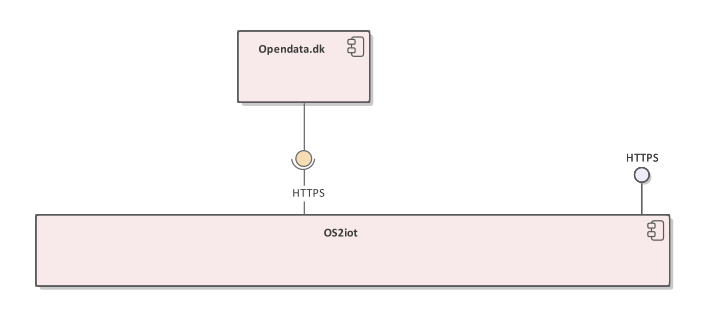
Opendata.dk
HTTP(S) Push data targets
Authentication

OS2iot integrates to the external authentication system: KOMBIT Adgangsstyring. See the seperate page for KOMBIT adgangsstyring.
IoT Device Integrations
This section describes the IoT device integrations. This covers both upstream and downstream messages, registering new devices etc. Each subsection covers a specific technology.
Generic IoT Device
Several of the protocols shown in Figure 3 - IoT device integration overview, use a generic HTTP endpoint for receiving data. Each device is identified by an API-key which is a UUID, this is passed as a URL parameter. This endpoint validates that the incoming data is JSON and that the device exists, by validating the API-key, in the database before the data is passed added to Kafka to be further processed.
Swagger: /api/v1/receive-data
NB-IoT (Telia)
NB-IoT devices are supported in OS2iot using the endpoint for receiving data from generic IoT devices as described in section 4.1. There are several reasons for this:
NB-IoT devices often come bundled with a proprietary backend that devices are hardcoded to send data to. From this backend, data can be sent to other systems such as OS2iot. Other devices might be configurable to send data to a specific endpoint. This heterogenous setup makes it very difficult to make general assumptions for how NB-IoT devices send data to OS2iot.
NB-IoT devices are typically managed either by the provider of the NB-IoT network or by another third party. This means that while it is possible to build NB-IoT device management functionality in OS2iot using the Ericsson DCP Platform, this will likely be redundant functionality in almost all cases.
LoRaWAN (Chirpstack)
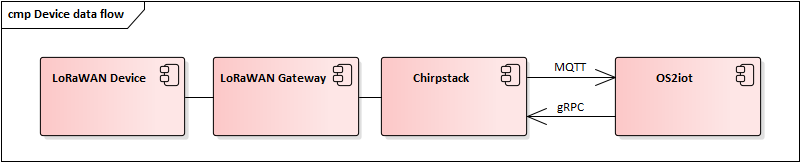
Chirpstack is used to communicate with LoRaWAN IoT devices. This means that OS2iot communicates with Chirpstack, which in turn communicates with gateways and devices.
This in turn means, that data must be synchronized between Chirpstack and OS2iot, such that LoRaWAN devices created in OS2iot are also created in Chirpstack.
Data from IoT devices is received by Chirpstack and sent to OS2iot by publishing to a MQTT broker which has OS2iot as a subscriber.
Data sent to IoT devices is sent from OS2iot to Chirpstack using gRPC. Communication between the IoT devices, gateways and Chirpstack is out of scope of this project.
The Chirpstack is comprised of the following 4 modules.
A postgresql database
An MQTT Broker
Data synchronization
Some data must be always be synchronized between OS2iot and Chirpstack. This includes:
Applications
Gateways
IoT devices
Device profiles
Multicast groups.
Changes to these entities must always happen in OS2iot, which is then synchronized to Chirpstack. It is not supported to change data directly in Chirpstack. The protocol documentation for the api is documented at https://www.chirpstack.io/docs/chirpstack/api/api.html.
Security
OS2iot and Chirpstack have separate security models and do not share users. Instead, all communication between OS2iot and Chirpstack is done using a service account with administrator permissions in Chirpstack.
For communicating with the chirpstack api, it is necessary to create a apikey on Chirpstack, which you must insert in the environment variable: CHIRPSTACK_API_KEY.
This apikey is included in the header in every call to the Chirpstack api and has the format of an Bearer token:
  makeMetadataHeader(): Metadata {
    const metadata = new Metadata();
    metadata.set("authorization", "Bearer " + configuration()["chirpstack"]["apikey"]);
    return metadata;
}
Prerequisites
In order to use the Chirpstack for LoRaWAN devices certain things has to be set up.
Gateway
Register gateway
Devices
Create device profile
Register device
Error handling
Errors which occur in integrations are handled and logged as much as possible. If the action was caused by a user, then the user will receive an error message detailing this. If the error occured without it being caused by a user, e.g. IoT-device sends data, then the error will be logged.
Communicating with edge devices
REST API is the easiest way to send payloads to edge devices. Retrieving data is done via MQTT.
Reading data
Join - Event published when a device joins the network. Please note that this is sent after the first received uplink (data) frame.
Status - Event for battery and margin status received from devices.
Uplink - Contains the data and meta-data for an uplink application payload.
Ack - Acknowledgements event published on downlink frame.
TxAck - Event published when a downlink frame has been acknowledged by the gateway for transmission
Error - Event published in case of an error related to payload scheduling or handling. E.g. in case when a payload could not be scheduled as it exceeds the maximum payload-size.
Register new device
Devices can be registered and activated on the network by to different means. Over-the-Air Activation (OTAA) and Activation by Personalization (ABP) Over-the-Air Activation (OTAA) is the most secure way to connect with Network. The network assigns a dynamic DevAddr and negotiate security keys with the device. In other cases the DevAddr as well as the security keys is hardcoded in the device. This means activating a device by personalization (ABP). “Device profile” has to be set in order to register a device. The Device Profile defines the boot parameters that are needed by the ChirpStack Server to “connect” with a edge device.
MQTT
There are two kinds of MQTT devices available. MQTT external broker and MQTT internal broker. These two devices works in different matters which will be described below.
MQTT external broker
The MQTT external broker device will make it possible for a physical device to communicate with the internal OS2IoT mosquitto broker. The MQTT external broker is created in the OS2IoT backend and is created with the credentials that the device needs for communicating with the internal broker.
The MQTT external broker device can either be created with username/password or credentials. If the publisher is created with username/password it will use port 8885, and if created with certificate it will use port 8884.
When a physical MQTT device will publish some data, then OS2IoT will check for the specific topic that the device is publishing to in the database, and if the topic is set in the database, it will process the data. If a MQTT external broker device with the specific topic isn’t created then the broker won’t be able to find it in the database and therefore it will reject the data.
The specific topic for the created device will be device/organizationID/applicationID/deviceID.
MQTT internal broker
The MQTT internal broker uses the MQTT protocol to subscribe to a topic on an external MQTT broker. A client is created in the OS2IoT backend. This client will connect to the external MQTT broker using the provided URL, port and authentication, and then subscribe to data on the provided topic.
OS2IoT doesn’t have any knowlegde of the external broker so it’s totally up to the user to provide the different inputs. If the input isn’t valid and a connection can’t be made to the external broker, a flag will be set in the database which tells OS2IoT that the connection can’t be made and then OS2IoT will stop trying to connect to the external broker.
If the inputs from the user IS valid, then a connection will be made and the device will listen to any updates from the broker.
The MQTT internal broker device has the possibility to use either certificate or username/password to a external broker if needed.
Sigfox
The Sigfox integration is a RESTful API over HTTP. They utilize the HTTP verbs (POST, GET, DELETE, PUT), and are based on the JSON format. Their documentation is located at https://support.sigfox.com/apidocs#section/API-overview.
In Denmark the SigFox network is operated by “IoTDenmark”: https://iotdk.dk/sigfox-iot/.
In SigFox’es information model they have “DeviceTypes” and “Group”, these can loosely be translated to “Applikation” and “Brugergruppe” in the OS2IoT model. Alternatively the integration could be implemented using just one DeviceType and one group for an entire OS2IoT installation.
The API is rate-limited, meaning that if too many requests are sent within a short timeframe, a 429 too many requests will be sent back.
Register new device
Before being able to register a new device, it’s required to have a DeviceType, which in turn requires a Group.
To register a new device, the “createDevice” API endepoint is called with the POST method. Here OS2IoT need to provide an id, a name, a deviceType and a “Porting Access Code” (PAC). The endpoint returns the unique identifier which the device is identified as by SigFox, this must be saved for future calls.
SigFox’es documentation for the API is located at: https://support.sigfox.com/apidocs#operation/createDevice
Update existing device
Receive data
To receive data SigFox recommends using their callback system (in other words WebHooks). That is when an IoT device sends a message to the SigFox network, SigFox will call-back to OS2IoT, with the information from the IoT device.
There exists three types of callbacks, DATA, SERVICE and ERROR. Under DATA there is two types, UPLINK and BIDIR (bidirectional), where UPLINK is probably the most common one for us to use. Under SERVICE, there is STATUS, ACKNOWLEDGE and DATA_ADVANCED. Here DATA_ADVANCED is interesting, as it allows us to geolocate and get metadata, but comes at the cost of a 30second delay, see https://build.sigfox.com/backend-callbacks-and-api#callbacks for more.
To achive this, OS2IoT must first create a callback configuration at SigFox using the API.
The callback is defined for one DeviceType, which means that OS2IoT will either have to implement one callback for all devices or one for each application in OS2IoT. Though they can be registered to the same URL.
They support three channels of callback: URL, BATCH_URL and EMAIL. URL means that Sigfox will produce one callback for each IoT device transmission, BATCH_URL means that data is pushed at most once pr. Second and contains all packages in that timeframe.
OS2IoT must also define the body of information it wish to receive as the bodyTemplate parameter.
More information about the custom callback features are located here: https://support.sigfox.com/docs/custom-callback-creation
SigFox’es documentation for the API is located at: https://support.sigfox.com/apidocs#operation/createCallback
To receive this information from the callback, OS2IoT must construct an endpoint for it to call.
To check if OS2IoT missed any callbacks OS2IoT could periodically call the callback errors API for each device type. It will return all the failed callbacks: https://support.sigfox.com/apidocs#operation/getCallbackMessagesErrorListForDeviceType
If downlink communication (from OS2IoT to IoT device) is desired, it can be achived using the callback or by giving the data to Sigfox for them to pass along to the device. See https://support.sigfox.com/docs/downlink-callbacks for more.
Restart device
It’s possible to restart multiple devices via their unique identifiers or to restart all devices of a certain type. Both methods are asynchronous via the Job concept in Sigfox. To restart multiple device the API: https://support.sigfox.com/apidocs#operation/devicesBulkRestart is used. And to restart the devices of a given type the API: https://support.sigfox.com/apidocs#operation/deviceTypeBulkRestart is used. At a later point the bulk job status API can be used: https://support.sigfox.com/apidocs#operation/getBulkJobForDevice.
Data Targets
This section describes the different possible data target types in OS2IoT, i.e. how incoming data from the IoT devices can be sent to receiving systems.
HTTP Push
HTTP Push is an method of integrating via registering a callback and then having the capability of receiving it. This is also how the SigFox integration works. The main advantage is that the initiator of the call is the party which knows that new information is available, thus needless pooling is avoided.
To support HTTP Push as part of OS2IoT, the user should be allowed to define the URL on which they’ll receive the callbacks, moreover the communication should be encrypted (over HTTPS) and using a way of authentication (HTTP basic Auth; or a secret header/url-parameter definded by the user, configured in OS2IoT).
If the receiver of the data want a higher level of assurance, then there are several ways of achieving it. A simple solution is retrying with an exponential back-off. Or an API exposing all messages which have not been acknowledged by the receiver, for a short period of time (for instance 3 days like SigFox).
MQTT
OS2iot supports publishing data to a broker when it’s received using MQTT. MQTT is a standard, lightweight messaging protocol based on the publish/subscribe pattern.
When configuring such a data-target, there’s a few terms and keywords to be aware of:
QoS: The QoS (Quality of Service) level determines the guarantee of delivery for a specific message. Different network environments may require different QoS levels. Ideally, the level should be set to match the network reliability and application logic. This is the main point of MQTT.
There are 3 QoS levels:
0 (at most once)
1 (at least once)
2 (exactly once)
There are a number of well written articles regarding QoS. One such example is this blog entry.
Topic: The MQTT data-target must be provided a topic with which it can label the data. This is used by the MQTT broker to filter messages from MQTT clients. Here, OS2iot is a client.
Connection authentication: The most common methods of authentication are username and password and/or client certificates. At the time of writing, username and password authentication is supported, but it can be extended to implement other methods.
You can read more on MQTT here
FIWARE
FIWARE data target allows users to integrate OS2IoT with any “Powered by FIWARE” platform by enabling the connection to the Context Broker Generic Enabler.
Data are send to the context broker via the /ngsi-ld/v1/entityOperations/upsert/ operation.
The output of the payload decoder function needs to comply with the NGSI-LD format as it is sent as a body of the request without any alteration. It should represent an array of objects to be updated.
The context (part of the NGSI-LD standard) can be provided in the request body or can be defined in the data target configuration. In the latter case, it will be included within the headers of the request.
The Fiware data target supports the multitenancy of the Context Broker (but not every context broker supports multitenancy). The name of the tenant can be specified in the configuration. If no value is provided, the default tenant will be used. To specify the tenant OS2IoT is using NGSILD-Tenant header.
If your Context Broker is secured with OAuth2 it’s possible to configure target to obtain necessary client credentials from Authentication Server. To do that it’s required to provide token endpoint together with Client ID and Client Secret while configuring the target.
Opendata.dk
Users of OS2iot can expose the data sent from their devices to opendata.dk by setting up a data-target to share with opendata.dk.
The IoTDevices whose data is exposed is the devices which are listed in the data-target. The data is transformed using their corresponding payload transformers. Each data-target which is shared creates one data-set is opendata.dk and in that dataset there is once resouce, namely an HTTP endpoint which exposes the data as an array of JSON objects.
Opendata.dk autogenerates their catalogue of OS2iot data, by parsing the DCAT json file which is exposed at the /api/v1/open-data-dk-sharing/{organizationId} endpoint.
The organizationId for your organization is shown in the frontend.
The data itself is exposed on the /api/v1/open-data-dk-sharing/{organizationId}/data/{shareId} endpoint.
Data and format
The data exposed is entirely defined by the payload transformer, and thus the user of OS2iot, rather than the system imposing a data format.